Saturday, 19 May 2012

MySQL

Once again using the useful article in the community section of the Ubuntu website, I will install MySQL. MySQL is database management system based upon SQL. As with all things, if you'd like to know more, check the MySQL Wikipedia page.

The single line command you need is
sudo apt-get install mysql-server libapache2-mod-auth-mysql php5-mysql
These are 3 seperate installs and as far as I can guess (and I am guessing):
mysql-server is the main part of the MySQL program
php5-mysql is a PHP module for MySQL
libapache2-mod-auth-mysql is shown from a quick Google to be "A module for the Apache 2 web server which enables HTTP authentication against information stored in a MySQL database".

The article suggests changing the memory limit, but I am going to leave it as 128 as I can always increase it later. I imagine it must be more efficient to leave it at the lowest level possible other wise surely it would just be set around the systems memory limit.

I am not installing any database administration software like phpMyAdmin yet as using the command line gives you more control and you can understand the behind the scenes workings. This will be a massive pain to begin with but should get easier as my knowledge grows.

One thing I didn't see in the article is that you need to restart Apache.
Friday, 18 May 2012

PHP

Installing PHP5

This useful article again tells you pretty much all you need to know.
2 (or 4) simple things to do and PHP is set up on your machine.

That wouldn't make much of a blog post. So I'm going to make a simple PHP site and set up my folders and settings before I move on to installing MySQL.

Settings and Folder structure

I decided that seeing as I would be creating projects, I would have a "Projects" folder in my home folder. Just use the command line or the GUI to do this.
If you were following the article mentioned above, you need to deactivate the site "mytest" by entering the following on the command line.
sudo a2dissite mytest
Now copy one of the virtual host files I named the copy "isitmikesbirthday".
I opened up this file and changed the DocumentRoot to /home/michael/Projects/isitmikesbirthday and changed the Directory to /home/michael/Projects/isitmikesbirthday/
After that I put an entry in the hosts file. In /etc/hosts I added the following line
127.0.0.1 isitmikesbirthday.local
Then I needed to enable the site with
sudo a2ensite isitmikesbirthday
And restart apache
sudo service apache2 reload

The first PHP script

All that's left is to create and index.php file in the folder Projects/isitmikesbirthday/
And it's in that file that the magic happens. I put...

<?php
if(27 == gmdate("j") && 9 == gmdate("n"))
     echo "Yes";
else
     echo "No";
?>

Thursday, 17 May 2012

Apache

Apache is HTTP server software. Apart from that, I'm not 100% sure what it does, I'm sure once I delve further into it I'll understand. In the mean time, read the Wikipedia article.

There is already quite a detailed article on installing Apache on Ubuntu on one of the Ubuntu community pages. This is the article I worked through and it seems to work fine.

It looks like it is possible to install almost everything you need for your L.A.M.P fun in two simple lines.

sudo apt-get install tasksel

then

sudo tasksel install lamp-server

But that's cheating!!
Anyway, I started this project to learn every step of the process, not to cheat.

Installing Apache2

I followed the Installing Apache 2 part of the article.
Incase you're brand new to using the command line I'll explain a few little things quickly.

sudo

- allows you to run programs with the security privileges of another user

nano

- is a text editing program

cp

- means copy

All reasonably easy once you get used to using the command line.

Editing Apache Configuration

A little further into the article is a section titled Edit Apache Configuration which lead me to another article about securing your Apache configuration. It seems it is safer to run Apache in it's own account. One day I'm sure I will find out why.

Securing Apache

Towards the bottom of the article is the section on Securing Apache which basically explains how to make sure that no one can access your development websites from another machine.

All in all that was surprisingly easy, even though I was blindly following instructions.

A little tip: If you try running a program but forgot to use sudo at the start, you can re-run it by typing sudo and double exclamation marks (sudo !!)

Linux (Ubuntu 12.04 (Precise Pangolin))

I am installing Linux as my Operating System for several reasons. For starters, Linux is what the 'L' stands for in L.A.M.P. The other two reasons are that I use it at work and would like to get more familiar with it and also that most servers run Linux.
Ubuntu is a free, open source 'flavour' of Linux which has a graphical user interface as well as text-based input. Version 12 is an LTS which stands for Long Term Support, meaning that it should be supported for at least 5 years.

In order to do a fresh install of Ubuntu on an OSless PC you first of all need to make a USB boot disk:
  1. Download the Ubuntu .iso from the download section of the Ubuntu website.
  2. Download Universal USB Installer.
  3. Put a USB in a USB slot and open Universal USB Installer.
  4. Choose the Linux version you are going to installer and the location of your Ubuntu .iso file
  5. Follow the rest of the instructions to create the USB boot disk.
Then all needs to be done is install Ubuntu on the new computer:
  1. Put the USB stick in the new computer
  2. Turn the computer on
  3. Select 'Install Ubuntu' from the options
  4. Follow all the instructions (they are pretty straight forward)
  5. Fill in the details for your machine. My machine is named Thomas (after the friendly engine)
The computer then does it's thing for around 20 mins and then needs a restart. You may find that the update manager also wants to install some updates straight away, this is fine. You should do another restart afterwards.

What impressed me:

  • No need to get drivers for the graphics card or wireless card.
  • It seemed to be pulling in live Tweets on the installation screen (how can something pull in live tweets from the internet without the OS even being completely installed???)

Problems I had:

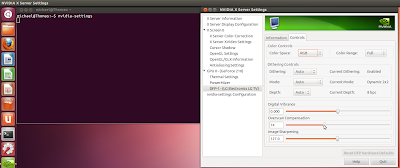
Use the slider to change the overscan compensation
  • At first the display was too big. This is an overscan setting of the graphics card. In the console* I typed

    nvidia-settings

    and up popped the setting panel where I changed the overscan compensation settings using the slider.
  • The computer wouldn't connect to my wireless router.I assume it was because the Ethernet cable was plugged in, or because the cable was plugged into the same router. I unplugged the cable and next time the computer started up, it was fine.
  • I restarted the computer and it booted onto the command line instead of the GUI. Turned it off-and-on-again and it seemed to be fixed!
*In order to get the console up, just hit Ctrl+Alt+t

Wednesday, 16 May 2012

The Hardware

Unboxing
Box full of goodies
The engine I endeavour to create should be efficient, therefore I have bought pretty much the cheapest machine I could find.
This lead me to Novatech where I bought the most basic Isys V2 which has an Intel Celeron G530 processor which is 2.4GHz, dual core and 64bit. The memory with the computer is 2 x 2GB 1333MHz DDR3. Simplez.
Since I didn't want to use a monitor, I bought a graphics card in order to connect my computer to my HD TV. The graphics card in person is a Novatech GeForce 210. The last little add on was a Novatech 300Mbps 802.11n Wireless-N PCI Adapter. This all came to a grand total of just under £300, which isn't bad. It was delivered free two days later AND to top things off, when I opened the box, they had thrown in a keyboard and mouse.

Fitting the extra components was easy. Unscrew a few screws to take the side panel off. Rip out two of those back bracket things (feel free to leave the correct terminology as a comment below). Push the cards in and screw them to the case.
Graphics card installed
Graphics card fitted to the motherboard

Tuesday, 15 May 2012

The beginning

The first post:


The point of this blog is for me to chronicle my attempts set up some websites from scratch. As part of this I hope to build my own PHP based MVC framework (engine).

About me:

I left uni in 2009 with a degree in Robotics. I returned to my home town and found it extremely hard to find a job. Eventually a web agency called Switchplane hired me even though I had never done any PHP. The two bosses, Tom & Joel, trained me up in PHP and MySQL. Tom and Joel had created their own framework which at the time I was impressed with but wouldn't truly come to realise it's awesomeness until I left and worked with other frameworks.

When I left the company, I left the comfort of framework I learnt to code in and realise that I didn't actually know the basics of PHP, how some HTML actually works and Apache, among other things.

In my new job I deal with a new framework and the other parts of L.A.M.P. development Linux and Apache. This prompted me to learn every stage of creating a website so that I can perform better in my job, in the future and hopefully help some others learn with me (or correct me) along the way.

My aims:


  • A PHP MVC framework
  • Object oriented
  • For the 95% (eg. won't try to hard to support IE6 etc...)
  • Up-to-date (HTML5 + CSS3)

Priorities:


  1. Google Friendlyness (Speed, W3C validation,Blind user accessibility,semantic web)
  2. Neat code
  3. End user usability
  4. Support for older hardware,software


The idea of this framework is that you never need to edit the framework, you will extend it or copy parts to a separate project.

Upcoming posts should be about the hardware and Linux.